Monday, August 25, 2008

Thinking Outside the Box

"Thinking Outside the Box". We hear this all of the time, but what does it really mean?

My mother used to ask me, "If all of your friends jumped of a cliff, would you do it too?"

"No, of course not" I would tell her.

"Good, then you are thinking for yourself".

Now this is certainly an extreme oversimplification of the situation (I was probably 7 or 8), but you catch the drift. Use your head, don't do something just because everyone else is doing it, seek unique ways of solving old problems. If you have to get down that cliff to get home, don't jump just because everyone else is doing it, build yourself a sled, or a parachute, or a glider. You'll still get there, just with less damage, and less damage is good. You'll stand out from the crowd because you'll be the only one that isn't bleeding.

You might remember my youngest son from "The Lost Rolls". Well, he turned four this spring. He goes to the library once a week to hang out with all of the other kids in town that are too young still for school, but enjoy the thrill of a well written story about a fire truck. They also do a weekly art project.

A few weeks ago, the teacher had all of the children sit around and mix up a batch of plaster. The kids mixed handfuls of dirt into the plaster to make it look like wet dirt. Handfuls of the muddy compound were scooped out and formed into flat circles as the base for that weeks project. There were boxes of assorted sticks, rocks, and bark that the young artists were instructed to press into the mud to create their masterpieces. Rocks were pressed in as eyes, sticks became mouths, and bark became hair and ears. Some kids made other types of two dimensional art, using the natural materials to create some very impressive designs in the mud.

When I finally saw my sons piece, my jaw literally dropped. He saw what everyone else was doing and decided to go another direction.

Good job son, you are thinking for yourself.


Scott bulger Photography Blog
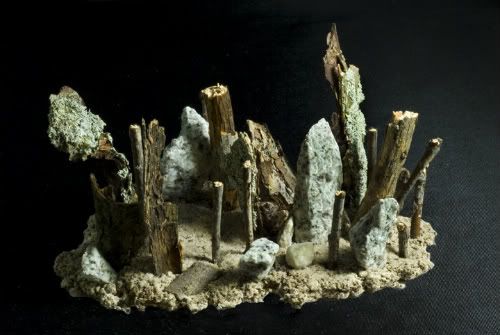
He calls it his "forest".


Wednesday, August 20, 2008

Image Critique #7

Today's installment of "Image Critique" has been generously submitted by Allie. Let's have a look, shall we.....


Scott Bulger Photography Blog

This is really a very nice shot. Nicely exposed and well composed. There is detail available in all parts of the white orchids petals, as well as plenty of detail to be plucked from the shadows. The small bud in the lower left corner is a very big part of the composition, as is the nicely diagonal line of the stem.

Just a couple of small things to note:

  • The upper right hand corner has a light fixture in it. It's pretty dark, and not offensive in any way, but being such a natural photograph, you might want to darken up that lamp if you can or eliminate it from your composition if possible. It just detracts from the naturalness of the scene a bit.
  • The ratio of this image as presented is 576 x 551. Close to, but not a square. If you actually crop it to square, the edges of your frame get too close to both the bud on the left and the bloom on the right.

Scott bulger Photography Blog

Any attempt at putting a matte over this image will result in a further encroachment of these two important compositional elements. This can be solved in a number of ways, but it's just something to think about when shooting in 35mm with the intention of cropping to square. The sooner you recognize the issue, the easier it is to correct.

Bottom Line: I wish that this blog post was longer, but this is really a terrific image. Well composed and well exposed. Very well done with a delicate situation.


Sunday, August 17, 2008

The Lost Rolls

I just finished preparing for a show that opens Labor Day weekend, so my studio is even more of a mess than it usually is, with piles of matte board, foam core, and glass strewn about the area. As I fumbled through the mess, attempting to get things back to some semblance of order, I uncover a small brown cardboard box. Not remembering there being a cardboard box in this particular area of my desk, I open it with some trepidation, not having any idea what I would find.

Well what to my wondering eyes should appear? Thirty undeveloped rolls of film, from times not so near.

I sorted through the canisters and rolls to find quite a variety of materials.

  • 2 rolls of 120 T-Max
  • 1 roll of 120 Agfapan 400
  • 18 rolls of 35mm Agfapan 400
  • 7 rolls of 35mm Agfapan 100
  • 2 rolls of 35mm Agfapan 25!
I ran my fingers through the film like I had struck gold. I picked them up and dropped them back into the box one at a time, just letting them roll off the edge of my fingers....plunk....clank....bonk.... I thought about what could be on the rolls, but I really had no idea. I couldn't even begin to imagine, so when I grabbed a couple rolls to head to the darkroom to process them, it was kind of like finding a bunch of lottery tickets. The anticipation of what I was going to find in the silver emulsion was coursing adrenalin through my body.

I plunged my hands into the darkness of the changing back and peeled open the canisters with my fingers. I wound the acetate onto the spools and closed up the canister. I pre-wet the film while I mixed up my Marathon, all the while with images of past photos flashing through my head. I knew this had to be personal film, as I never would have let film from a job go missing.

The six minutes of developing seemed to last an eternity. Out with the Marathon and in with the stop bath. Another minute goes by. Out with the stop bath and in with the fixer. Five more minutes. Out with the fixer and wash. I'm dying to look inside now and see what I have, but somehow I manage not to open the canister. Out with the water and in with the fixer remover......wash it again and in with the photo-flo. When I pour out the last of that, I can't help but peel off six inches of film to see what I have. I see a couple shots of El Castillo at Chichen Itza in Mexico.

"Cool" I say as I give the spools a quick rinse before throwing them in the dryer. "Must be more Mexico stuff." I don't even bother to look at the other roll. I know it's been processed properly, so whatever is there will still be there after it's dry.

The "ping" of the dryer timer let me know that the negatives were ready. I removed the stainless steel reels from the dryer tube and took them over to the counter. I pulled the film from the grooves and started cutting them into strips of six so I could scan them into the computer. I did a double take as i saw what was actually on the roll. After the first couple frames of El Castillo, the rest of the film was from the day my last son was born (four and a half years ago). Not only was it from the first day of his life, it was actually from the first hour. Most of the roll his eyes aren't even open yet, but they do ease open a little bit towards the end of the roll.

I had struck gold after all.


Scott Bulger Photography


Scott Bulger Photography


Scott Bulger Photography


I guess I'm going to have to develop those other twenty eight rolls soon.

Monday, August 11, 2008

Image Critique #6

Hello again. It's time for image critique #6. Thanks for following along.

Todays image was submitted by Pam. Thanks Pam.


Scott Bulger Photography Blog Image Critique #6


I'm going to start off small and work up. This isn't a bad image, but there are a few simple things that would improve it immensely.

1. Posture. The subjects spine is tipped to the right and her shoulders are tipped to the left. This is important because the back is so prominent in the composition. It looks a little awkward and not very comfortable. This is more than likely caused by the subject sitting on a sloped wall, throwing off her balance. I'd like to see the chin up just a little bit higher as well.

2. Eyes. I'd like to see more eye here. The way her head is positioned, she might me looking down, or her eye might be closed. It's tough to tell. If the eyes are in the frame, you should be able to tell what they are doing.

3. Selective Coloration. I'm not going to make any bones about it, I don't like selective coloring. I think it's dated and gimmicky. Selective coloring first made it into the popular mainstream in the 80's with those cute little kids in the overalls on the swingset with the 5 year old boy giving the 5 year old girl a cute flower. Given that, I can tell when it accomplishes what it is supposed to do, and this doesn't do that. Coloring the flowers at the end of the brides arms draws the viewers attention away from what you should be trying to get them to look at, and that's the bride. I can't think of a single situation where this technique would be compositionally appropriate. People that like it, tend to like it because it's "different" and they haven't seen it before. Once they see it a few times, it becomes old hat. So even if a client "wants" it, they probably aren't going to think it's so unique 20 years from now when they have gone through their wedding photos 100 times..

Scott Bulger Photography Blog Image Critique #6


If you must use this technique, try to use the color to attract the viewers eyes to where you want them to look.

4. Contrast and Tonal Range. This is an extremely contrasty image and must be handled carefully. As seen in the histogram below, there are very few mid-tones here.


Photobucket - Video and Image Hosting

Try to balance the image a little better using more of the available tonal range. Also, watch out for the bright spots. When dealing with wedding dresses, this can be very tricky. You want the dress to be white, but not so white that you can't see any detail. There are chunks of the dress that are to bright.

5. Depth of Field. A little less Depth of Field would have been helpful here, allowing the background to be lighter without all of the trees and branches being a distraction. I'm not talking about a lot lighter, just a little, stretching out that low end of the histogram. Treat this as a portrait, and open up your aperture.

Since we are talking about Histograms, just let me say that there are no "good" or "bad" histograms. They merely provide us with information and allow us to illustrate something that can sometimes be difficult to explain.

Bottom Line: This image is OK, but a few minor alterations while shooting could have really perked it up. The client might like it, and that is great, but it's not an image that will stand the test of time.


Thursday, August 7, 2008

Never Surrender - Understanding Exposure and Why it's Important

Everyone knows it happens, but most people don't know how it happens or why it happens.

The automation of cameras has made users lazy. You can just set it to "Automatic" or "Program", press the shutter button, and voila, a properly exposed image.

Q. "Why do I need to know all of this stuff if the camera will figure it out for me?"

A. Because it gives you control, and surrendering creative control of your work to a machine is never a good idea.

Exposure is the process of allowing the appropriate amount of light into your camera for the appropriate amount of time to properly expose your cameras sensor or film. To understand exposure, you need to understand three things; ISO, Aperture, and Shutter Speed. Contrary to popular belief, there are a hundred different combinations for any given scene that will give you an identical and proper exposure.

Let's talk about these three elements individually.

ISO

ISO is the same as "Film Speed". I know, there is no film in a digital camera. But there is a sensor and when you adjust the ISO, you are adjusting the sensors sensitivity to light, the same way that changing film to a film with a different film speed would make the film either more or less sensitive to light.

Common ISO's are:

100
200
400
800
1600
3200

100 is the "slowest" or least sensitive to light, and 3200 is the "fastest" or most sensitve to light. If you look at these numbers closely, you'll see a pattern here. Each number is either double or half of the number on either side of it. This means that each ISO is either twice as sensitive to light, or half as sensitive to light, as the ones right above and below it.

Shutter Speed

Shutter Speed is the amount of time that the shutter is open and allowing light to pass through onto the film or sensor.

Common shutter speeds are:

1/2
1/4
1/8
1/15
1/30
1/60
1/125
1/250
1/500
1/1000
1/2000
1/4000

Please note that these are all fractions of a second. Some cameras eliminate the fraction, just using the denominator as an indicator. I once had a student proclaim "There is no way that I can hold still for 125 seconds!" She was both right and wrong. She was right that she could not hold still for 125 seconds. She was wrong in thinking that the proper exposure time was 125 seconds. It was 1/125th of a second. It's much easier to stay still for 1/125th of a second.

Now look at this list of numbers.... do you see the pattern? Each shutter speed is either twice as fast or half as fast as the one on either side of it. Each time you move the shutter speed one step, you are either letting light in for twice as long or half as long as the previous shutter speed you were using.

Aperture

Aperture is the number that refers to the size of the opening in your lens that controls the amount of light that is let through the lens. This light is stopped prior to reaching the film or sensor by the shutter. Do not confuse "aperture" with "f-stop". They are similar and related, but not the same thing.

Common apertures are:

1.4
2.0
2.8
4
5.6
8
11
16
22
32

This is where it can get tricky. The smaller numbers at the top of the list are the larger openings, letting in more light. The larger numbers at the bottom of the list are smaller, letting in less light. The aperture of a lens is very similar to the pupil of your eye, expanding and contracting to let in the proper amount of light for any given subject. While it may not be readily apparent, each aperture in this list is either twice as large or half as large as the aperture on either side of it, letting in either twice as much light or half as much light as the neighboring openings.

Smaller Number = Larger Opening
Larger Number = Smaller Opening


Putting it All Together

It is the combination of these three things that gives you a properly exposed image. The "Sunny 16" rule states that on a bright sunny day outdoors, if you set you camera to f16 and your shutter speed to the inverse of your ISO (or as close as you can), you will get a proper exposure. The red lines on the chart below show the exposure recommended by the "Sunny 16" rule. From that point, all of the other exposures are extrapolated. All of the white lines on the charts are also proper exposures.


Scott Bulger Photography

Starting from the suggested red line exposure, if you want a faster shutter speed, all you have to do is adjust your aperture the same amount of steps in the opposite direction. If you want a different aperture, all you have to do is adjust your shutter speed the same amount of steps in the opposite direction. See how easy that is?

Why do you need all of these options? Control. You want to control how your final image looks. Shutter Speed controls motion, and Aperture controls Depth of Field, so by adjusting your exposure based on these factors, you can control how much Depth of Field you have or you can control how much Motion is shown in your photographs.

In my next installment of "Never Surrender", we'll discuss how controlling the Depth of Field and Motion will affect your final image.

Sunday, August 3, 2008

Don't be Greedy

Quality, not quantity. Let me say it one more time. Quality, not quantity.

Ansel Adams once said "Twelve significant photographs in any year, is a good crop."

Twelve. One per month.

Now Mr. Adams definition of "significant" and your definition of "significant" are sure to vary wildly, but this is for certain, you shouldn't be shooting 36 frames on a Sunday, and be thinking that 8 of them are suitable for framing, display, or sale. You need to be much more stringent in the way that you look at your photographs and in the way that you perceive photography in general.

Digital photography should make it easier for photographers to be better editors, since it costs nothing to delete the 150 horrible images you shot yesterday and go back out and try again today, but it seems to have had the exact opposite effect for many people with cameras. They think that they can go out and shoot 150 shots today and 15 of them are good enough to show and then they can go out again tomorrow and shoot 150 more frames and have 15 more that are good enough to show. This leads to an abundance of mediocre and bad photography being displayed and watering down the pool of images available for viewing.

I once had a person with a camera brag to me about going out in the field and shooting 300 frames an hour. All I could do was laugh. It's impossible to go out walking around in the woods or in a city, and properly visualize, compose, and shoot 300 frames in an hour.

300 frames in one hour equals:

5 frames per minute, or one frame every twelve seconds. Do you see how ludicrous this is?

The rationalization for this, was that this persons photography instructor had told them that digital photography was cheap so that they should shoot a lot. Now either one of two things occurred here. The student was saddled with a well intentioned but misguided photography teacher, or the student simply misunderstood the intention of the teachers comment. Sure, digital photography is cheap, and that allows you to shoot a lot, and by a lot, I mean all day long, or every day, or as often as you would like without concern for the cost of film and processing. What it does not mean, is attaching a camera to your face and just running around tripping the shutter every 12 seconds. If that's what you were supposed to do, you could just get a 35mm motion picture film camera, turn it on and shoot 24 frames per second wherever you went, and cull through the resulting garbage looking for the one or two decent images that you might stumble upon. Even a blind squirrel will find a nut once in a while.

Every frame should be pre-visualized. You should see in your mind what you want the final image to look like and use your camera accordingly. Pointing and clicking isn't going to cut it.

There are three phases of competence in any skill:
  • 1. Learning
  • 2. Knowing
  • 3. Owning
Applying this to photography:

You first are LEARNING how. You meter a scene for light to calculate an exposure and look at a chart to get the proper combination of shutter speed and aperture. You look up how the depth of field is affected by the aperture and adjust your camera accordingly. While composing within your viewfinder, you run through the compositional rules in your notebook, applying different ones and viewing the results.

Secondly you are KNOWING how. You step outside with your camera and look at the light. You know the proper aperture and shutter speed that you will have to use for a proper exposure and you know how the depth of field will be affected by the f-stop you choose. You hold up your camera to your eye and you move the camera around, knowing that a certain composition will work better than another one, all the while running through this information in your head.

Finally, you are OWNING the process. You pre-visualize what you want your final image to look like and you instinctively set your camera and compose your image to get the desired outcome. Now you might decide that this image isn't what you had hoped for after all, but at least you aren't operating with a scatter-gun approach.


Vase and Flower, Scott Bulger Photography

"Wooden Vase and Flower"